Information about the Autopay user portal
The Autopay Portal is the transaction portal of the Autopay payment gateway, where you will find all the information about the transactions carried out in your shop and a range of other important data.
If you want to learn how to use the Autopay portal - follow the instructions below. If you have questions that are not answered here - please follow the instructions below. consult our knowledge base , where we explain the most important issues.
Logging
To log in to the Autopay portal:
-
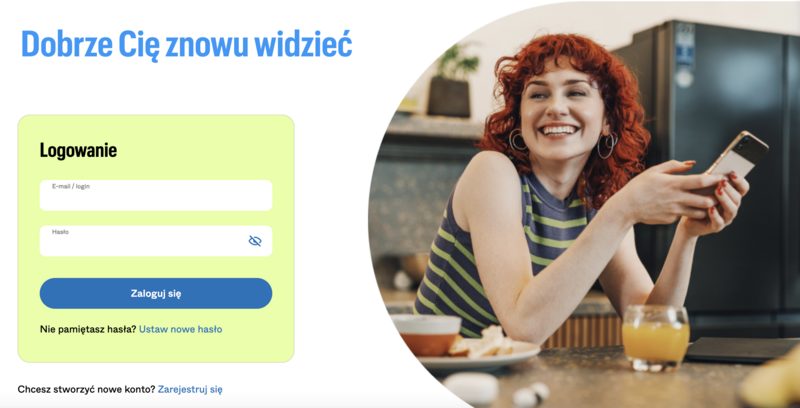
Go to portal.autopay.eu/panel
-
Fill in your login and password, then click Log in.
- Complete the authorisation code sent to your phone number.

Suggestion!
If you do not remember the correct password, click Set a new password and enter your email address.
This will send an email to your inbox containing a link to change your password.
If you can’t find it, please check SPAM and other folders.
Important: Also make sure you log in using the correct address:
- test mode - https://testportal.autopay.eu/panel
- production mode - https://portal.autopay.eu/panel
If you have logged into the previous version of the Administration Panel up to now, please use the
links:
- test mode - https://testportal.autopay.eu/admin
- production mode - https://portal.autopay.eu/admin
Start
Once logged in, you have access to the most important information about your shop.
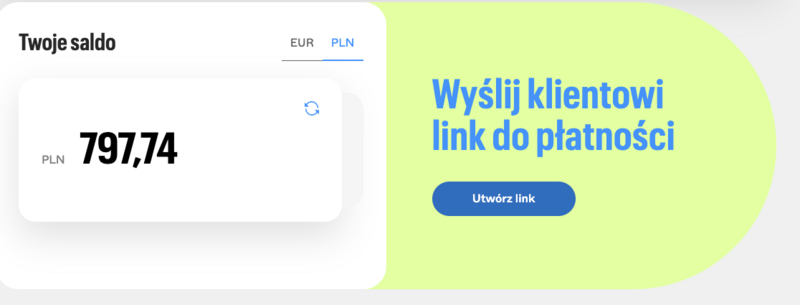
From this level, you can view your current balance, create a payment link and familiarise yourself with
system messages and available special offers.
Service configuration
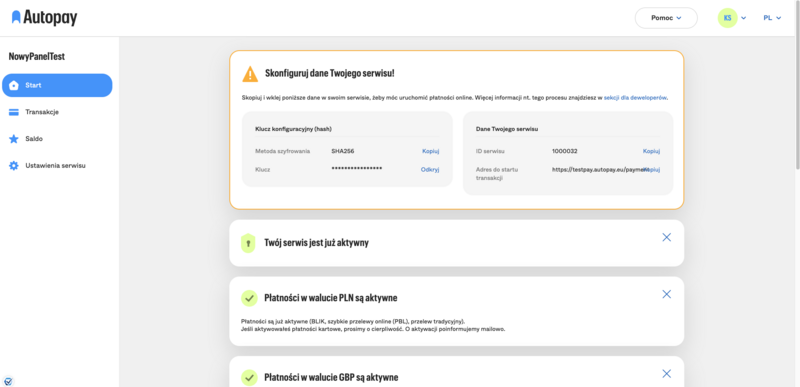
Important! If you have not configured your shop pay attention to the information available in the
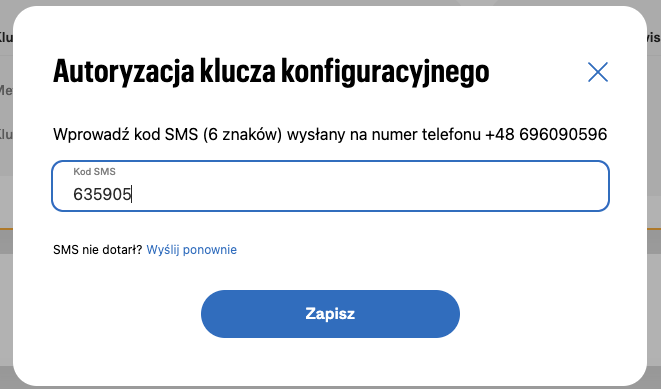
Configure your service data tile. To discover the configuration key you will need to enter the
authorisation code you will receive in an SMS message.
Generation of a payment link
To generate a link, click Create link available on the Start tab.
In the next step, complete the form and confirm with the button Create and send a link.
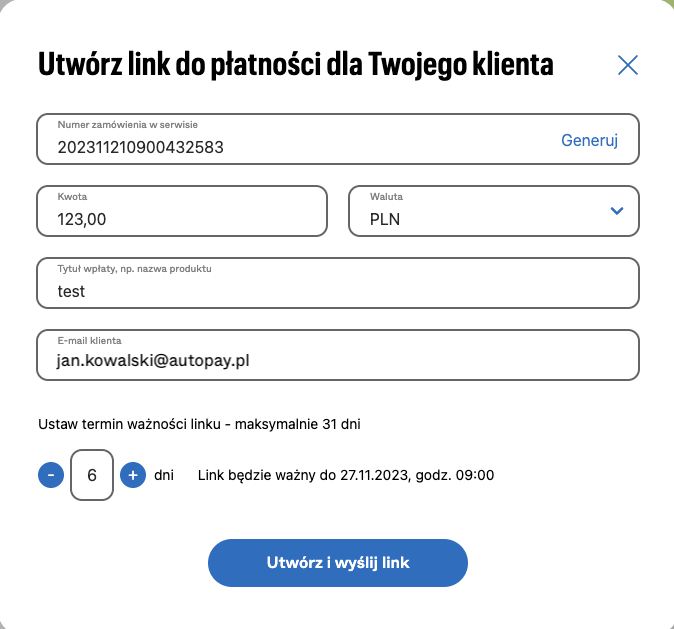
Once approved, the payment link will be sent to your customer at the email address provided. You can also copy it and hand it in personally.
Transactions
This is the tab where you will find all the data on transactions that have been carried out with
the gateway, over the selected time period.
To access the list of transactions, select the following tab from the top menu Transactions. There you can
filter the visible information by selecting the date range or currency you are interested in. You can enter
a specific date range or select an additional filter that helps to display transactions by their
start date or payment date. It is worth using these mechanisms, as they make
searching easier - especially if there are multiple payments ordered in the shop.
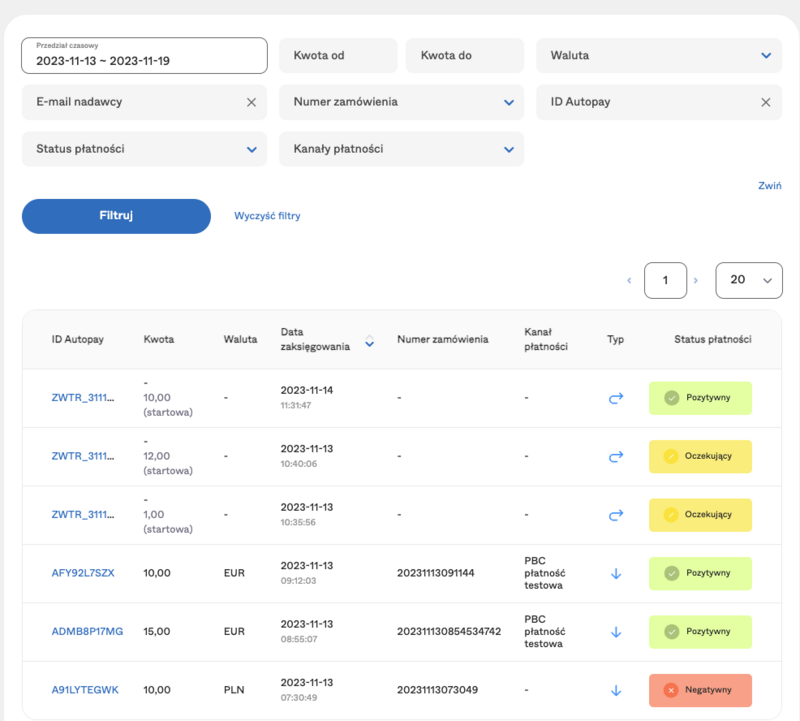
Using the filters below, you can easily search the summary of transactions:
-
ID Autopay - The 10-character identifier generated by the Autopay System -
visible on the customer's transfer confirmation. Example: APRN82S9XX; -
OrderID - the order number on the Partner's website. After clicking on
the button next to the "OrderID" field, several additional search options will appear using
this data. - Payment channel - any form of payment e.g.: BLIK
-
Payment status - After selecting the payment status (e.g.: Positive), we will display you
all payments from the selected time period that have been paid correctly; - Transaction amount – you can find transactions by entering the amount of the payment made;
- Sender's e-mail – you can search for transactions by entering the customer’s email address;
Suggestion!
If you do not select any filter, the portal will display all generated transactions.
Types of transactions
The transactions were divided into four types.
- All - This includes all transactions that are not settlement transactions such as withdrawals and balance deposits.
- Incoming - Here you will find all transactions that have the type "Incoming" and are not balance top-ups.
- Returns - Here you will find all transactions that are not settlement transactions such as withdrawals and balance deposits and have a 'Return' type.
- Wrong - Here you will find all transactions that are not settlement transactions such as withdrawals and balance deposits and have a status of 'Negative', i.e. their validity period has expired, for example.
Transaction statuses
Transactions can take on one of three statuses:
- Positive
- Pending
- Negative
Transaction filters
Using the filters below, you can easily search the summary of transactions:
- ID Autopay - A 10-character identifier generated by the Autopay System - visible on the customer's transfer confirmation. Example: APRN82S9XX
- Order number - the order number on the Partner's website;
- Payment channels - any form of payment e.g.: BLIK
- Payment status - after selecting the payment status (e.g.: Positive), you will be shown all payments from the selected time period that have been paid correctly. The available statuses are Positive, Negative and Pending;
- Sender's e-mail - you can find transactions by entering the customer's e-mail address;
You can also sort your transactions by amount and date using the arrows next to the relevant columns.
Important: Transaction history is available up to one year back.
Transaction details
To access the details of the transaction click on ID Autopay the transaction of your choice.
When the user clicks on a transaction, he or she is presented with a view of its details.
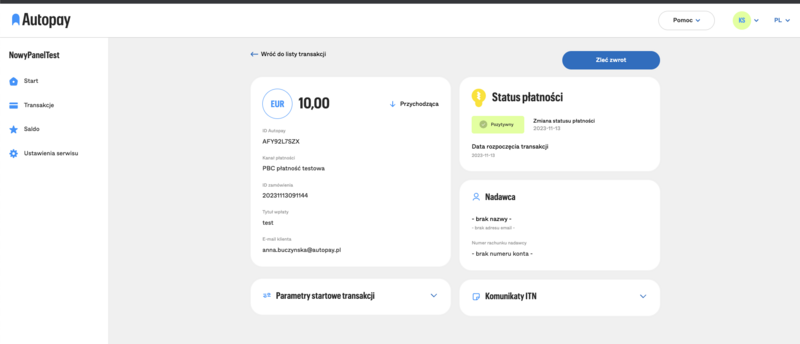
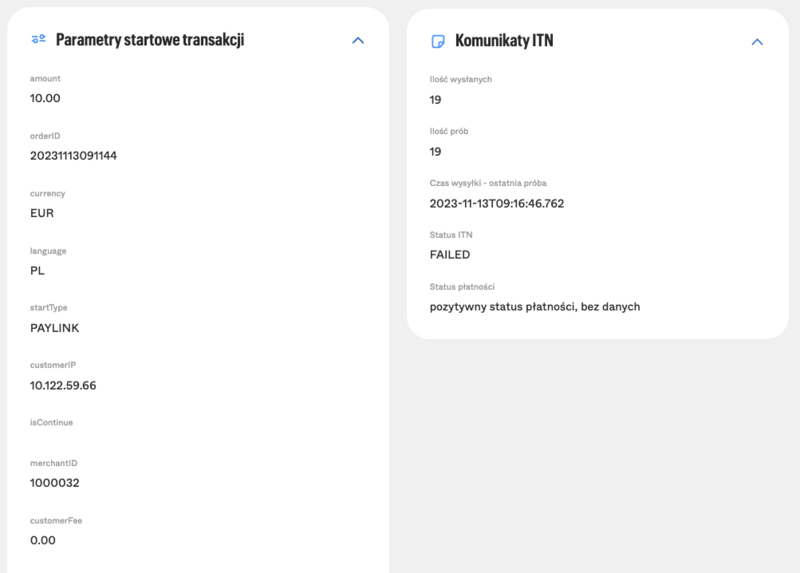
It can also expand the tabs with start-up parameters and ITN messages
How do I order a transaction back?
Reimbursement is possible from the transaction details level. To order it, click the Order
Refund button and then confirm this operation.
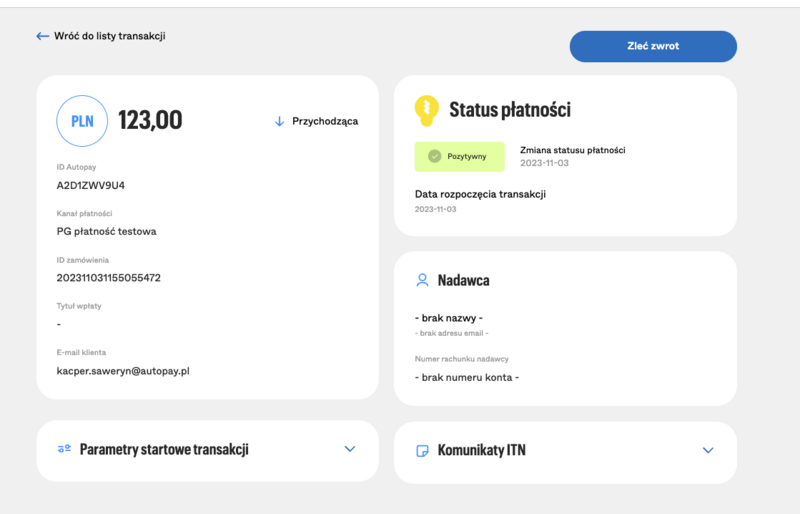
If the refund is feasible, i.e. for example, the balance allows it or the transaction
has not previously been subject to a full refund, the operation will be confirmed with the message "The refund
has been made".
Refunds in most cases can be ordered within one year from the date of receipt of the input transaction.
Exceptions are payment channels i.e. BLIK and card payments, where refunds can be ordered up to 6 months from
receipt of the input transaction.
Reports generated
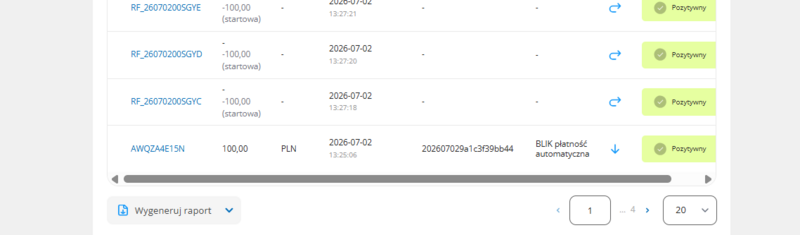
From the tab Transactions You can generate a transaction report containing data from the currently selected service.
How do I generate a report?
- Go to the tab Transactions.
- You can optionally set filters to narrow down the data (date range, payment status, amount, payment channel).
- Click the button Generate a report visible below the list of transactions.
- Select a file format: XLSX or CSV.
- Confirm the generation.
Where can I find the generated reports?
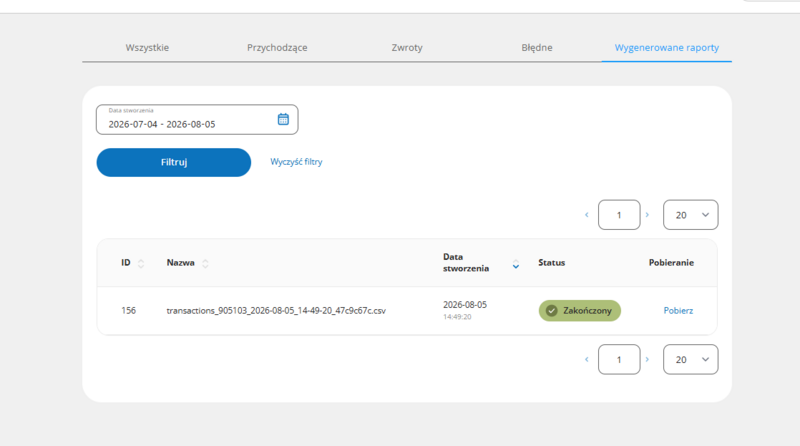
All generated reports are available in the sub-section Reports generated in the tab Transactions.
Click Download, to download the report to your device.
- ID Autopay
- Order number
- Transaction amount
- Transaction date
- Payment channel
- Payment status
Important! The ‘Generate report’ button is only visible if there are any transactions on the site that match the selected filters. If you cannot see this option, it means that there are not yet any transactions on the selected site.
Important! The report contains data solely from the currently selected site and in accordance with the filters set. If you have access to multiple sites, please ensure that the correct site has been selected before generating the report.
Balance
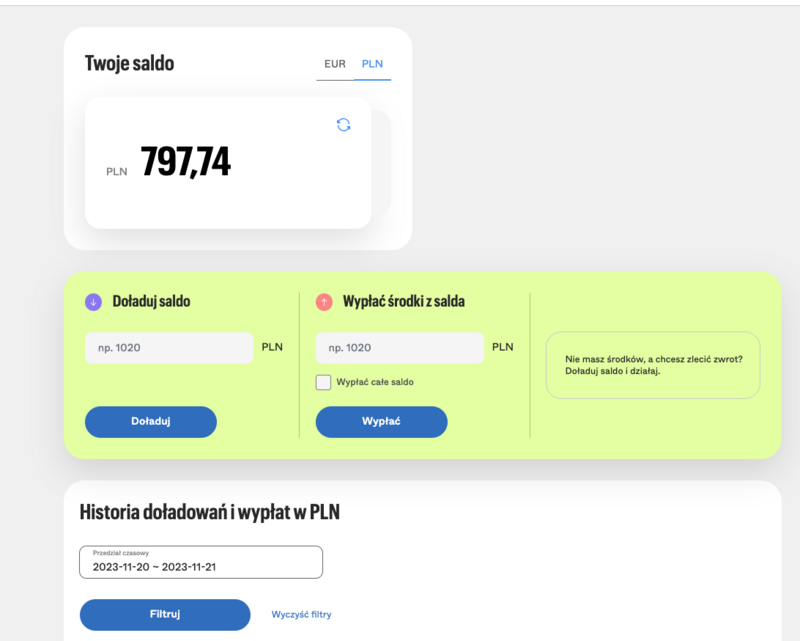
This is the tab where you will find all your balance data. Here you can check
your current balance, top-ups, withdrawals and check your top-up and withdrawal history.
Topping up the balance
To top up your balance, click Recharge and complete the form, then click Create link.
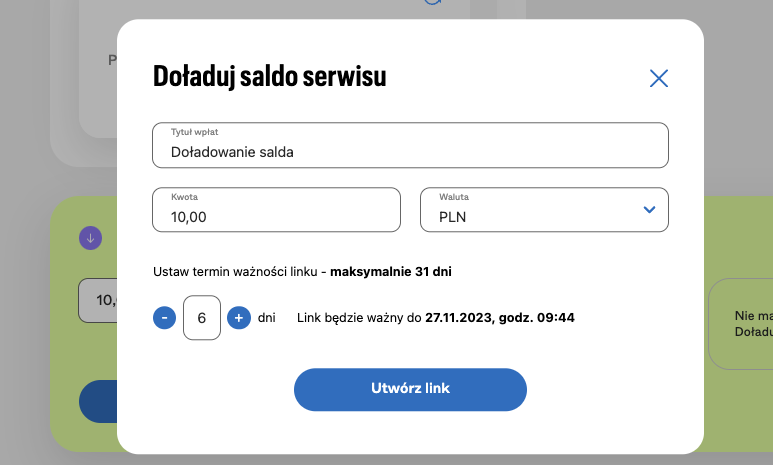
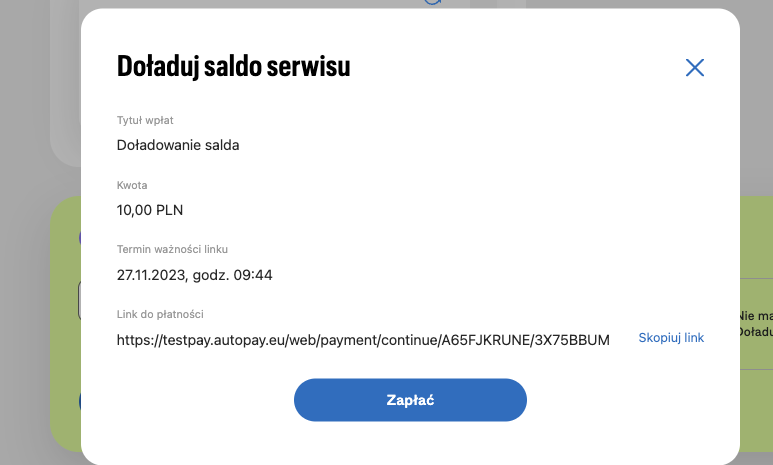
In the next step, click the Pay button to be redirected to the payment gateway or copy
the link and paste it in your browser.
Suggestion!
Top-ups are only possible for PLN currency.
Balance withdrawal
To withdraw funds, enter the amount and click on the Pay.
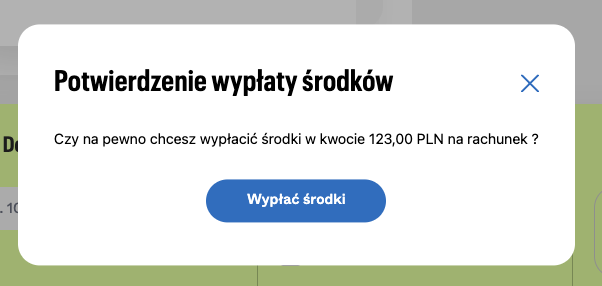
Once the operation is confirmed, your balance will be reduced by the specified amount and the funds will be
transferred to your bank account.
In your top-up history, you can check your top-ups and balance withdrawals.
In order to efficiently search for the data you are interested in, you can use additional filters, i.e. dates, amounts,
payment statuses, as well as search for top-ups alone or withdrawals alone.
Analytics
This tab provides a visual summary of data on transactions processed in your shop. The charts allow you to quickly assess current sales, compare the popularity of payment methods and check the distribution of payment statuses without having to analyse raw reports.
To go to the analytics section, select the tab from the side menu Analytics.
Scope of data
Once you have opened the tab, select the period for which you wish to view the data. Predefined time ranges are available (e.g. the last 7 days, 30 days), and you can compare the selected period with a reference period.
Suggestion! Use the period comparison feature to easily spot changes in sales trends, such as a week-on-week decrease or increase in the number of transactions.

Available charts
Number of transactions per channel
The number of transactions during a selected period, broken down by payment channel (e.g. BLIK, card, bank transfer). This allows you to assess sales activity and compare the popularity of the different channels.
Share of payment channels
The percentage share of each payment channel in the total number of transactions. This shows which payment methods are most popular in your shop.
Payment statuses
The number and proportion of transactions by status: approved, declined, pending. This helps to assess the quality of the payment process.
Returns
Returns data has been separated into a distinct area of analysis. This allows the scale of returns to be monitored independently of standard transactions.
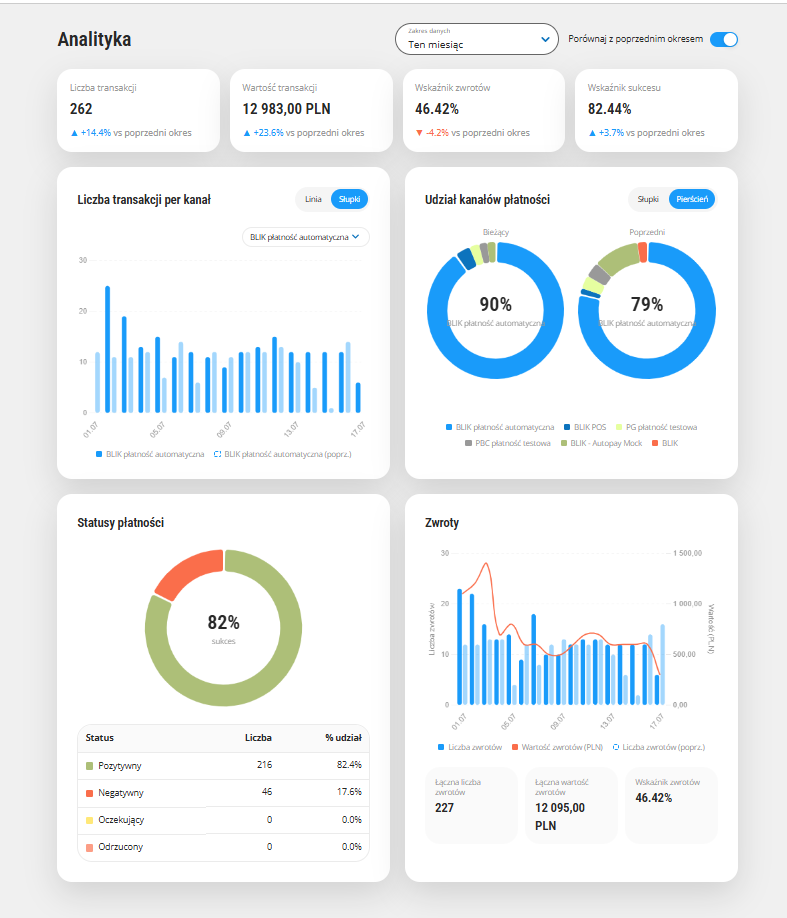
On the first screen, you will see a summary of the data for the selected range. This will show you the transactions that have been successfully completed. If a transaction is still pending, it will only be added once it has been finalised.
How do you use analytics?
- Select a tab from the side menu Analytics.
- Set the date range you wish to analyse.
- Optionally, enable a comparison with the previous period.
- Browse the charts – hover over elements of the chart to view detailed values.
- If you wish to narrow down the results, use the available filters.
Important! The Analytics section presents data in the form of illustrative charts. If you need to download detailed transaction data to a file, use the tab Transactions, where you can export to CSV/XLS.
Knowledge base
In the Knowledge Base section, you will find educational materials on card payments. This section is available only to users who use payment cards.
To go to the knowledge base, select the tab from the side menu Knowledge base.
What can you find in the Knowledge Base?
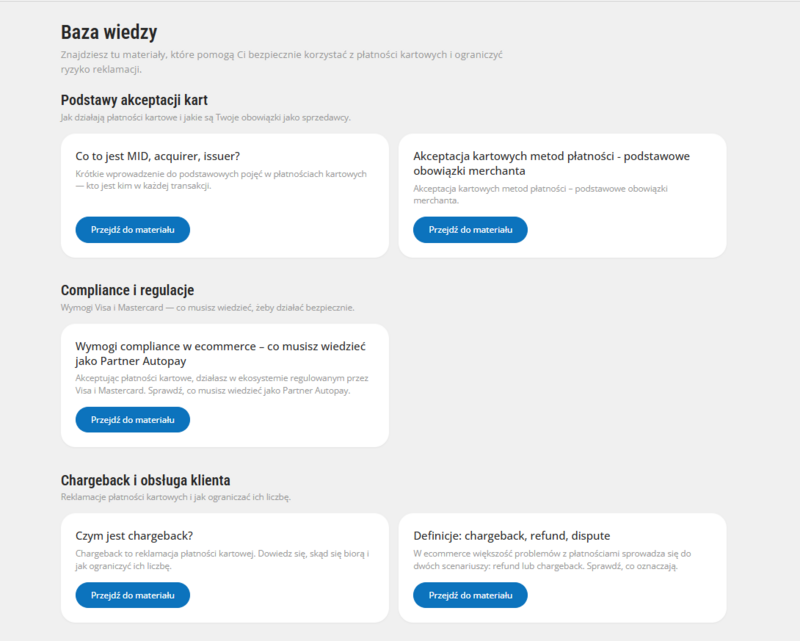
The materials are grouped into thematic modules:
The basics of card acceptance
How card payments work: what you need to know to get started.
Compliance and regulations
The Visa, Mastercard and PCI DSS requirements that apply to your shop.
Chargebacks and customer service
What is a chargeback, where does it come from, and how can you reduce the number of complaints?
Security and fraud
How to recognise and minimise the risk of card fraud.
Each module includes a brief introduction to the topic and a list of resources. Click Open the materials, to go to the selected module.
How do I use the Knowledge Base?
- Go to the tab Knowledge base in the side menu.
- Select the thematic module you’re interested in.
- Read the introduction and click on the material of your choice to open it.
In addition, the following may appear at the top of the page banners displaying important messages, e.g. information about new requirements or changes to regulations. Click ‘Find out more’ to view the details.
Important! The Knowledge Base section is only visible for websites with active card payments. If you cannot see this tab, it means that card payments are not currently enabled on your website.
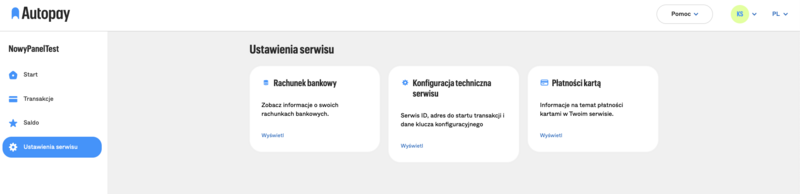
Service settings
The service settings include information on bank accounts,
technical configuration and card statuses.
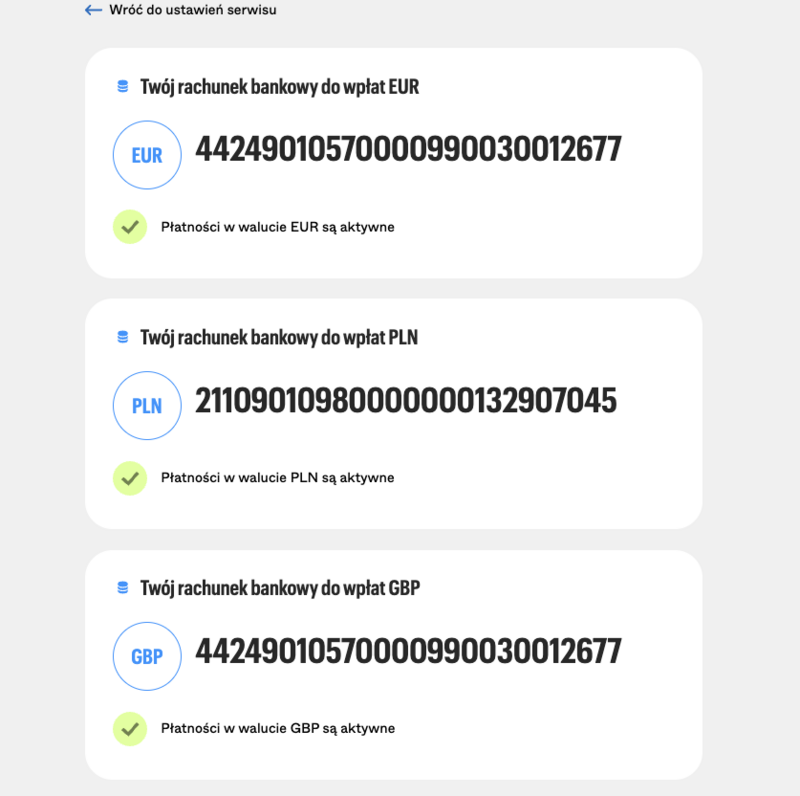
Bank account
The My Accounts section provides information on bank accounts for a particular currency.
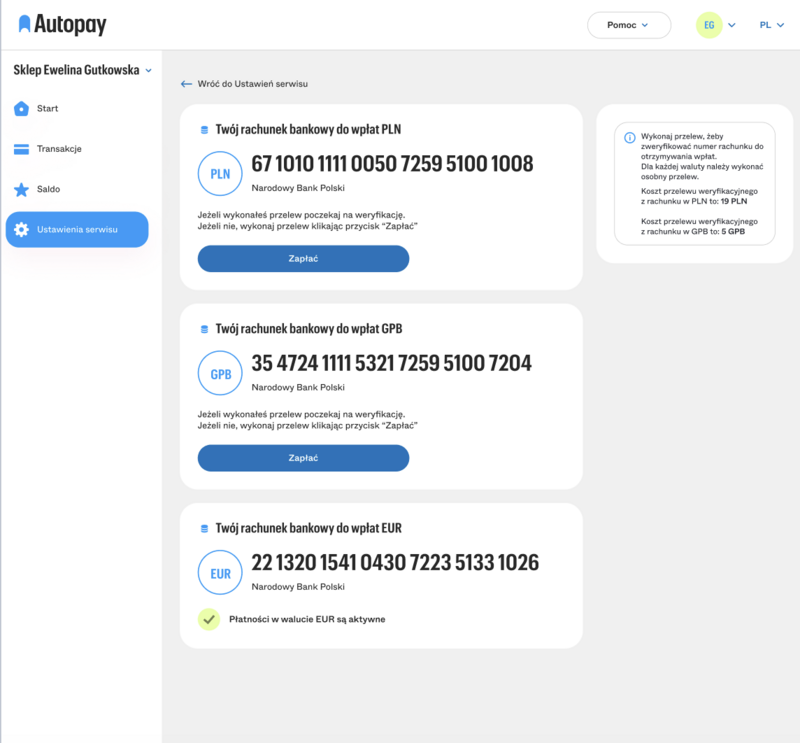
In the absence of a verified account, the Pending section also shows a button to pay
a verification transfer.
Would you like to add support for a new currency to your shop? Then get in touch with us! Contact details
can be found in the Help.
Technical configuration
Detailed information about the service can be found here.
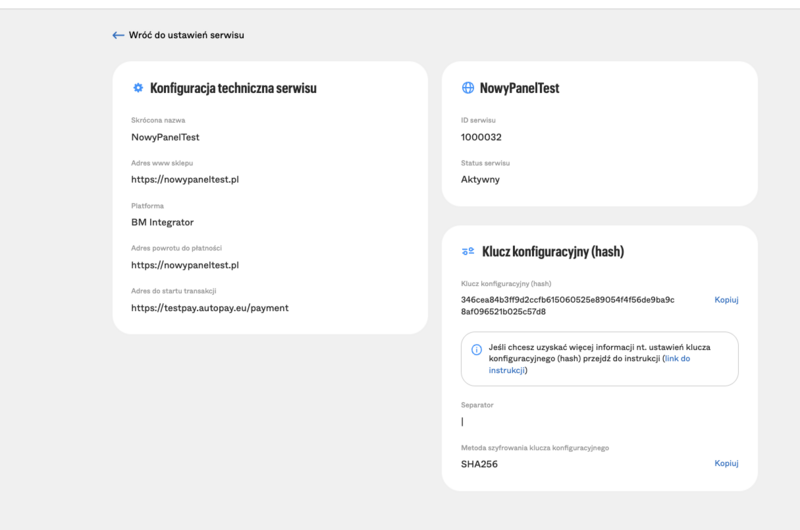
After clicking on the 'Edit' button, you can change the platform you are using.
Suggestion!
If you are changing platforms to a different/dedicated system you will need to provide the addresses for the payment return and receipt of the ITN notification. You can find more information about return addresses and ITNs at our website.
If you need additional assistance with the configuration of your service please contact us via platnosci@autopay.pl.
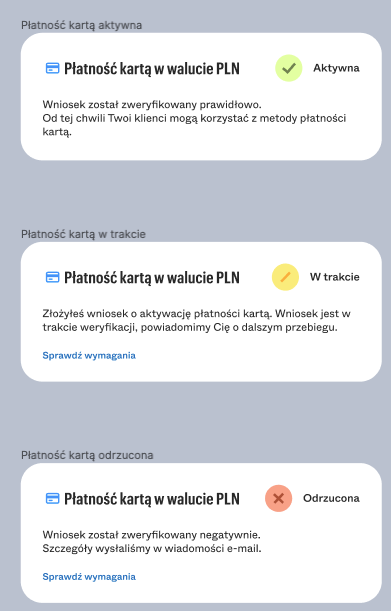
Payment by card
The statuses of card payments can be found here.
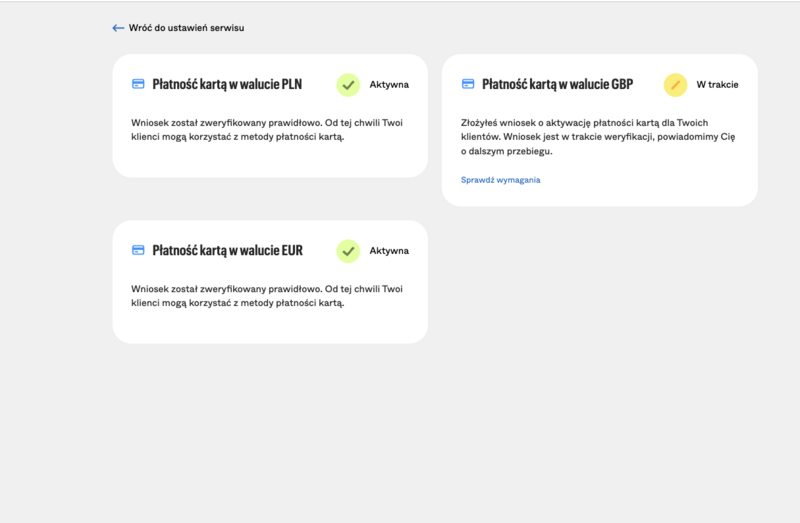
The statuses are divided into Positive, Negative and Pending. If you would like more information
on the status of the cards please contact
platnosci@autopay.pl.
Documents
The documents section is accessible from the side menu. Once selected, you will be able to access the most important information on recent documents, i.e. invoices, reports and regulations.
- Regulations - To view your terms and conditions, please use the "Download" button. The terms and conditions will be downloaded to your device.
- Invoices - From this level, you can view the latest invoices for your service. You can download them in pdf format or select an xlsx or csv file where you can find reports on the transactions linked to your invoice.
- Reports - The reports view shows the latest reports according to their type. From this level, you can download them to your device in xlsx and csv format.
Help
The section is accessible from the top menu. In this section you will find the Contact, Instructions and
Privacy Policy tabs.
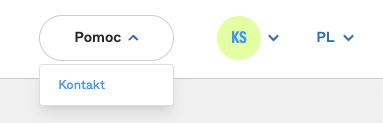
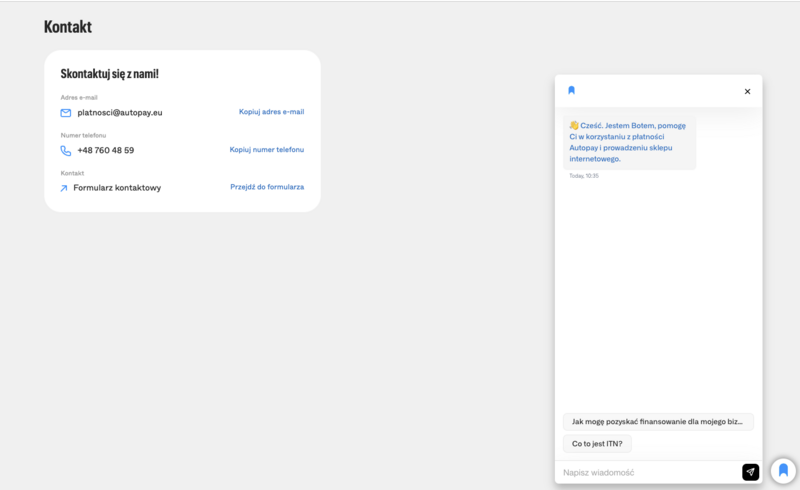
When you enter the Contact tab, the contact information for Autopay is displayed. You can also get quick answers to your questions and ask our ChatBot.
 Podziel się opinią