The manual of "Autopay" module for Magento 2Pobierz
Basic information
The Autopay Online Payment Plugin for Magento is the easiest way to allow your online store customers use the most popular payment methods. When integrated with the store, the plugin offers the possibility to add over 400 banks to the payment options.
Main functions
The main functions of the module include:
- support of many stores simultaneously using one module
- support for shopping without registering on the site
- support of two modes of operation - test and production (for each of them separate account data are required, which you should ask us for)
- implementation of two ways to display forms of payment in the store:
- on the Autopay site - classic or personalized view (after agreement with Autopay),
- on the store page - integrated, the customer is taken straight to the bank or card payment page.
Requirements
- Magento version: 2.3.0 - 2.4.8.
- PHP version: 7.4 - 8.4 (according to the requirements of your Magento version).
Hyvä Checkout compatibility
BlueMedia_BluePayment supports the standard Magento checkout. For stores using Hyvä Checkout, a separate compatibility module is available: BlueMedia_HyvaPayment.
The Hyvä module:
- integrates the Autopay payment method with Hyvä Checkout,
- supports the main Autopay method and separated payment methods configured in the base module,
- adds templates, styles and the Magewire component required by Hyvä Checkout,
- provides an optional override for the Hyvä payment method list template.
Install it only when the store uses Hyvä Checkout. See the Hyvä module README for details.
What's new in Autopay?
Installation
With composer
- Execute the command:
composer require bluepayment-plugin/module-bluepayment
- Activate the module
Via the zip package
- Download the latest version of the module from this site.
- Upload the .zip file to your Magento root directory.
- While in the Magento root directory, run the command:
unzip -o -d app/code/BlueMedia/BluePayment bm-bluepayment-*.zip && rm bm-bluepayment-*.zip
- Proceed to activate the module.
Activating the module
Activate using the command line
- While in the Magento root directory, run the following commands:
-
bin/magento module:enable BlueMedia_BluePayment --clear-static-content -
bin/magento setup:upgrade -
bin/magento setup:di:compile -
bin/magento cache:flush
and the module will be activated.
Activation via admin panel (only up to Magento 2.3 version)
-
Log in to the Magento admin panel.
-
Choose System -> Web Setup Wizard from the main menu. The system will ask you to log in again - do this to continue the activation.
-
Go to Component Manager, find the BlueMedia/BluePayment module in the list, click Select and then Enable.

-
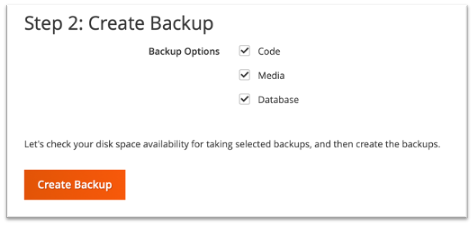
Click Start Readiness Check to initiate the dependency check execution, then click Next.
-
If you wish, you can back up your code, media and database at this point by clicking Create Backup. Then click Next.

-
Click Enable to disable your online store while the payment gateway is activated..
-
Activation may take a few minutes. When it is successful, you will see the following message:

Configuration
- Log in to the admin panel in the Magento 2 platform.
- Choose from the menu: Store -> Configuration.
- In the next menu select: Sales -> Payments methods.
- Next, expand Other payment methods and select Online Payment Autopay.
Basic module configuration
- Go to Module configuration.
- Fill in the mandatory fields:
- Set Enabled to Yes.
- Fill Title – the name of the payment visible to your customers - it can be for example Secure Online Payment.
- Set the Test Mode
- Fill in the details of supported currencies (you will receive them from Autopay)
- Service partner ID
-
Configuration key (hash) - you will receive it from Autopay, you can also read it in the Autopay adoministration panel Test Environment, Production Environment in the service details as Klucz konfiguracyjny (hash)

- Refresh cache
Configure payment channels
- Log in to the administration panel in Magento 2 platform.
- Choose BluePayment -> Gateways from the left side menu.
Payment channel selection in store
- Go to Module configuration.
- Set Yes (whitelabel) for Show payment gateways in store.
- Refresh cache
Refresh the list of payment channels
- Go to List of Payment Gateways.
- Click the Synchronize Gateways command found on the right side of the screen.
The module allows you to automatically refresh the payment channel every 5 minutes. To use this feature - configure CRON, according to Magento documentation available at this link.
Editing payment channels
- Go to the list of Payment Channels.
- Click on the name of the channel you want to edit.
- You can edit the following data:
- Status – whether the channel is currently available (if CRON is configured correctly - channels are refreshed every 5 minutes);
- (informative) Currency
- (informative) ID
- (informative) Bank Name
- (informative) Name
- (informative) Maximum payment amount
- (informative) Minimum payment amount
- Description – displayed to the customer below the payment channel name
-
Sort Order – the sort order in the list of channels, where:
- 1 – first position in the list,
- 2 – second position in the list,
- ...
- 0 – the last position in the list.
*For separate payment methods, the aggregate method **Autopay** (transfer payment) has a default order of 1. If you want to set a separate method over the Autopay method - use negative values (-5, -4, -3, etc.).* - Type.
- Is separated method – displays the channel as a separate payment method
- (informative) Gateway Logo
- Use Own Logo for payment channel
- Logo Path – address to your own logo (visible when Use Own Logo is checked)
- (informative) Status Date – date and time the payment channel data was last updated
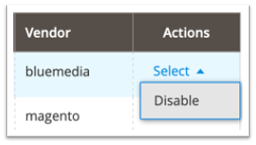
- Force Disable – enables deactivation of the selected payment channel (regardless of Status)
Expandable channel list
Option available since version 2.9.0 - default on.

If you want to always display the full list of payment channels:
- Go to Module configuration.
- Select Disabled for Collapsible gateway list option.
- Refresh cache
Refresh cache
Refresh the cache after each configuration edit. To do this:
-
Go to System -> Cache Management.
-
Check Configuration checkbox.
-
Select Refresh from the pull-down menu.
-
Click Submit

BLIK 0
BLIK "in-store" is characterized by the fact that the transaction security code must be entered directly on the store's website - in the last step of the shopping process.

BLIK 0 activation
- Go to Module configuration.
- Select Enable for BLIK 0 option.
- Go to edit the channel with ID 509 and bank name BLIK.
- Check Is separated method option.
- Refresh cache
Google Pay
This option allows you to pay with Google Pay directly on the store page - in the last step of the shopping process.
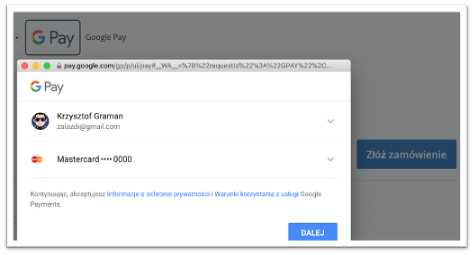
Activating Google Pay
Google Pay is default activated and always displayed as a separate payment method.
Automatic payments
One Click Payments – One Click Payment – is another way to make convenient card payments. They allow you to make quick payments without the need for the customer to enter all the card credentials each time. The payment process involves a single authorisation of the card payment and allocation of the card details to a specific customer. The first transaction is secured with the 3D-Secure protocol, while subsequent transactions are processed on the basis of the card debit request sent by the partner. Automatic payment is available only to logged-in customers of your store.
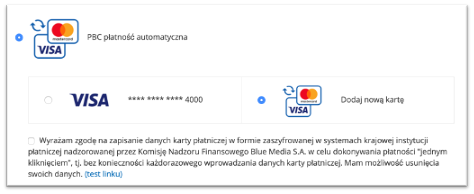
Activate automatic payments
- Go to module configuraation.
- Fill Autopay Agreement with the appropriate terms and conditions - to be accepted by the customer.
- Go to edit the channel with ID 1503 and type Płatność automatyczna.
- Set Is separated method optioon.
- Refresh cache
Card management
The payment card will be stored and linked to the customer's account during the first correctly executed transaction using automatic payment and acceptance of the terms of service.
The customer can remove the stored cards from his/her account in your online store - he/she only has to:
- Log in.
- Go to My account from the top menu.
- Choose Saved payment cards from the menu on the left. He/she will then see a list of saved cards:

- Click Remove and confirm.
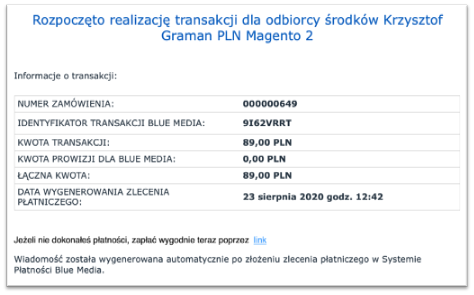
Generating orders from the administration panel
The module allows you to send a link to the payment to the customer for orders created directly in the administration panel. To do this, select the payment method Autopay when creating an order.
Payment link will be sent by Autopay to the e-mail address visible in the client's data.
E-mail templates
For messages:
- email_creditmemo_set_template_vars_before
- email_invoice_set_template_vars_before
- email_order_set_template_vars_before
- email_shipment_set_template_vars_before
module extends the list of available variables with payment_channel. Example usage in the template:
{{var payment_channel|raw}}
Redirection waiting page
The module allows you to add an intermediate page, displayed before the user is redirected to the payment itself. This feature can be used for example for e-commerce tracking in Google Analytics.
Template used: view/frontend/template/redirect.phtml
Activation
To activate the redirection waiting page:
- Go to Module configuration.
- Select Enable for Show waiting page before redirect option.
- Fill Seconds to wait before redirect – to specify how long the page should be displayed.
- Refresh cache
Refunds
The module allows you to refund money directly to the customer's account from which the payment was sent, via a Credit Memo on-line and directly from the order.
Refunds are performed asynchronously - first a refund order is placed, and then it is processed by the Autopay system.
Updating is done via CRON.
Via a Credit Memo on-line
To refund this way:
- Go to Invoice details for the order.
- Click Credit Memo in the top menu.
- Complete the form with the number of items to be refunded and the charges.
- Click Refund to confirm the action.
The refund will be generated automatically.
Direct refund
This option allows you to refund money directly to the customer's account from which the payment was sent. To use this option:
- Go to Module configuration and check Enable for Show manual Autopay refund in order details option. This will make this action available for all completed orders paid through this module.
- Go to the order details.
- If the order was paid using the Autopay payment method, you should see the "Autopay return" button in the top menu.
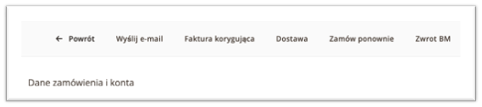
- When you click it, you will see a window that allows you to make a full or partial refund.
- For a partial refund, enter the amount in the format "000.00" (dot as decimal separator).
- Confirm the refund request by clicking OK, and a message will appear confirming that the refund has been processed or why it failed
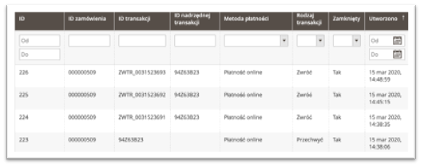
- Information about the return is visible:
-
in the order comments

-
on the transaction list
-
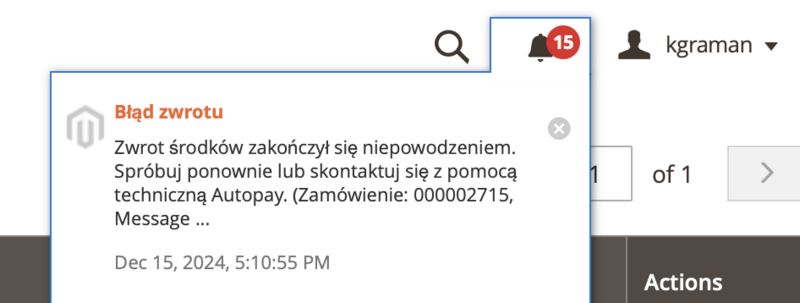
Notifications
If the return fails, the module generates a notification in the admin panel.
The notification and the order comment contain a detailed reason returned by Autopay (for example, lack of funds on the Autopay balance or an exceeded transaction amount).
For this purpose, it is required to launch and activate the Magento_AdminNotification module.

Delivery to multiple addresses (multishipping)
This module allows you to pay for orders placed using the multishipping functionality. Configure the delivery according to documentation.
The payment module itself does not require any additional steps. Autopay payments will be available immediately.
NOTE!
The module in multishipping mode supports ONLY the display of available payment channels on the store page and automatic payments. It is not possible to run Google Pay and BLIK 0 payments. For multishipping orders, the OrderID in messages to the customer and in the portal.autopay.eu panel will be the cart number with the QUOTE_ prefix, not the order number.
Information about payment
Information about the payment channel selected by the customer is visible from the Order grid.
To do this, add a column Payment Channel.
The text information about the payment channel will be visible in the table.
Information about the selected payment channel is stored in the database:
- in the blue_gateway_id (channel id) and payment_channel (channel name) column in the sales_order table,
- in the payment_channel (channel name) column in the sales_order_grid table.
Custom event
Option available since version 2.19.0.
When a new payment status is received - one of the events is triggered:
-
bluemedia_payment_failure- payment failed, -
bluemedia_payment_pending- payment pending, -
bluemedia_payment_success- payment success.
Events are triggered when a new order status is saved. Provided event data:
-
order-\Magento\Sales\Model\Orderinstance -
payment-\Magento\Sales\Model\OrderPaymentinstance -
transaction_id-stringtransaction identifier in BlueMedia system
Promoting installments payments
Why promote?
- More sales
- Fewer abandoned shopping carts
- More customers
Customers are more likely to decide to buy products, even at a higher price, if they can pay later or spread the repayment in installments.
The option is available only if Alior Installments or Buy on tailored installments payments are available for the service.
The option is triggered automatically only for new module installations - in case of updates, go to manual configuration.
Configuration
- Go to Module configuration.
- In tab Promoting payments set up in which places promoting payments should be visible.

Example visualization
At the top of the page

Under the navigation

On the product list

On the product page under the buttons

In the shopping cart under the products

Asynchronous ITN processing
Option available since version 2.24.0.
The module allows asynchronous processing of ITN (Instant Transaction Notification) notifications sent by the Autopay system after the completion of a transaction. Enabling this option means that ITN notifications will be processed in the background, which can be useful in scenarios with higher loads or specific requirements for handling notifications. It also resolves the issue of “status races.”
By default, the Autopay module uses queuing with MySQL (connection “db”). If you wish to use RabbitMQ instead, queue configuration adjustments are required as per the instructions.
To use this functionality, Magento must have the Magento_MessageQueue and Magento_MysqlMq or Magento_Amqp modules enabled.
CRON must also be properly configured as per the Magento documentation.
NOTE! When using the standard CRON configuration, the status update may take up to a minute, depending on the CRON execution frequency. If more frequent updates are needed, a separate consumer for the queue must be started:
Activation
- Go to module configuration.
- Ustaw Enable for option Asynchronous process ITN
- Refresh cache
Integration with GraphQL and Magento PWA
The module has a dedicated GraphQL extension for integration with headless applications (PWA Studio, Vue Storefront, custom frontends).
Installing the GraphQL module
composer require bluepayment-plugin/module-bluepayment-graphql
bin/magento setup:upgrade
bin/magento setup:di:compile
bin/magento cache:flush
Compatibility table
| BlueMedia_BluePayment | BlueMedia_BluePaymentGraphQl | Magento | PHP |
|---|---|---|---|
| 2.31.0 | 1.3.0 | 2.4.6 - 2.4.8 | 8.1 - 8.3 |
| 2.21.2 | 1.2.6 | 2.4.2 - 2.4.5 | 7.4 - 8.1 |
GraphQL module repository: https://github.com/bluepayment-plugin/module-bluepayment-graphql
PWA Studio module is available at: https://github.com/bluepayment-plugin/bluepayment-pwa-studio
Update
Via composer
- Execute commands:
composer update bluepayment-plugin/module-bluepayment
bin/magento setup:upgrade
bin/magento setup:di:compile
bin/magento cache:flush
Via the zip package
- Download the latest version of the plugin from this site.
- Upload the zip file to your Magento root directory.
- While in the Magento root directory, run the following commands:
unzip -o -d app/code/BlueMedia/BluePayment bm-bluepayment-*.zip && rm bm-bluepayment-*.zip
bin/magento setup:upgrade
bin/magento setup:di:compile
bin/magento cache:flush
- The module is already active.
Deactivate module
Deactivate with the command line
- while in the Magento root directory, run the following commands:
bin/magento module:disable BlueMedia_BluePayment --clear-static-content
bin/magento setup:upgrade
bin/magento setup:di:compile
bin/magento cache:flush
Deactivation through the admin panel (only up to Magneto 2.3 version)
-
While logged into the admin panel, select System -> Web Setup Wizard from the main menu. The system will ask you to log in again.
-
Go to Component Manager and find the BlueMedia/BluePayment module in the list and click Select and then Disable.
-
Click Start Readiness Check to initiate the dependency check and then click Next.
-
if you wish, you can back up your code, media, and database at this point by clicking Create Backup.
-
Once the backup is done (or unchecked) - click Next to proceed.
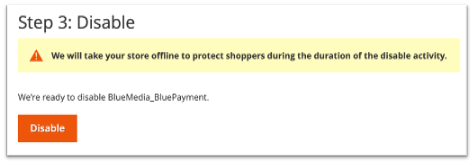
-
Click Disable to deactivate the store.
-
Deactivation may take a few minutes. When it is successful, you will see the following message:
Clean up the files and database (optional)
- While in the Magento root directory - delete the directory:
app/code/BlueMedia - Make the following database queries:
DROP TABLE blue_card;
DROP TABLE blue_gateway;
DROP TABLE blue_refund;
DROP TABLE blue_transaction;
- To delete the entire module configuration - make the following database query:
DELETE FROM core_config_data WHERE path LIKE 'payment/bluepayment%';
Najczęściej zadawane pytania
Sprawdź jakie pytania dotyczące wtyczki Magento 2 pojawiają się najczęściej
Pytania ogólne
Nie znalazłeś odpowiedzi na swoje pytanie? Sprawdź naszą bazę wiedzy, gdzie zebraliśmy wszystkie pytania dotyczące naszych usług.